On this page
Node and npm support
Modern Node.js projects will run in Deno with little to no reworking required. However, there are some key differences between the two runtimes that you can take advantage of to make your code simpler and smaller when migrating your Node.js projects to Deno.
Using Node's built-in modules Jump to heading
Deno provides a compatibility layer that allows the use of Node.js built-in APIs
within Deno programs. However, in order to use them, you will need to add the
node: specifier to any import statements that use them:
import * as os from "node:os";
console.log(os.cpus());
And run it with deno run main.mjs - you will notice you get the same output as
running the program in Node.js.
Updating any imports in your application to use node: specifiers should enable
any code using Node built-ins to function as it did in Node.js.
To make updating existing code easier, Deno will provide helpful hints for
imports that don't use node: prefix:
import * as os from "os";
console.log(os.cpus());
$ deno run main.mjs
error: Relative import path "os" not prefixed with / or ./ or ../
  hint: If you want to use a built-in Node module, add a "node:" prefix (ex. "node:os").
    at file:///main.mjs:1:21
The same hints and additional quick-fixes are provided by the Deno LSP in your editor.
Using npm packages Jump to heading
Deno has native support for importing npm packages by using npm: specifiers.
For example:
import * as emoji from "npm:node-emoji";

console.log(emoji.emojify(`:sauropod: :heart:  npm`));
Can be run with:
$ deno run main.js
🦕 ❤️ npm
No npm install is necessary before the deno run command and no
node_modules folder is created. These packages are also subject to the same
permissions as other code in Deno.
npm specifiers have the following format:
npm:<package-name>[@<version-requirement>][/<sub-path>]
For examples with popular libraries, please refer to the tutorial section.
CommonJS support Jump to heading
CommonJS is a module system that predates ES modules. While we firmly believe that ES modules are the future of JavaScript, there are millions of npm libraries that are written in CommonJS and Deno offers full support for them. Deno will automatically determine if a package is using CommonJS and make it work seamlessly when imported:
import react from "npm:react";
console.log(react);
$ deno run -E main.js
18.3.1
npm:react is a CommonJS package. Deno allows to import it as it was an ES
module.
Deno strongly encourages use of ES modules in your code, and offers CommonJS support with following restrictions:
Use .cjs extension
If the file extension is .cjs Deno will treat this module as CommonJS.
const express = require("express");
Deno does not look for package.json files and type option to determine if
the file is CommonJS or ESM.
When using CommonJS, Deno expects that dependencies will be installed manually
and a node_modules directory will be present. It's best to set
"nodeModulesDir": "auto" in your deno.json to ensure that.
$ cat deno.json
{
  "nodeModulesDir": "auto"
}

$ deno install npm:express
Add npm:express@5.0.0

$ deno run -R -E main.cjs
[Function: createApplication] {
  application: {
    init: [Function: init],
    defaultConfiguration: [Function: defaultConfiguration],
    ...
  }
}
-R and -E flags are used to allow permissions to read files and environment
variables. permissions.
Deno's permission system is still in effect when using CommonJS modules. It
is necessary to provide at least --allow-read permission as Deno will probe
the file system for package.json files and node_modules directory to
properly resolve CommonJS modules.
*Create require() manually
An alternative option is to create an instance of the require() function
manually:
import { createRequire } from "node:module";
const require = createRequire(import.meta.url);
const express = require("express");
In this scenario the same requirements apply, as when running .cjs files -
dependencies need to be installed manually and appropriate permission flags
given.
require(ESM)
Deno's require() implementation supports requiring ES modules.
This works the same as in Node.js, where you can only require() ES modules
that don't have Top-Level Await in their module graph - or in other words you
can only require() ES modules that are "synchronous".
export function greet(name) {
  return `Hello ${name}`;
}
import { greet } from "./greet.js";

export { greet };
const esm = require("./esm");
console.log(esm);
console.log(esm.greet("Deno"));
$ deno run -R main.cjs
[Module: null prototype] { greet: [Function: greet] }
Hello Deno
import index.cjs
You can also import CommonJS files in ES modules, provided that these files use
.cjs extension.
Deno does not look for package.json files and type option to determine if
the file is CommonJS or ESM.
module.exports = {
  hello: "world",
};
import greet from "./greet.js";
console.log(greet);
$ deno run main.js
{
  "hello": "world"
}
Notice that in this example no permission flags were specified - when importing CJS from ES modules, Deno can staticaly analyze and find relevant modules without having to probe file system at runtime.
Hints and suggestions
Deno will provide useful hints and suggestions to guide you towards working code when working with CommonJS modules.
As an example, if you try to run a CommonJS module that doesn't have .cjs
extension you might see this:
module.exports = {
  hello: "world",
};
$ deno run main.js
error: Uncaught (in promise) ReferenceError: module is not defined
module.exports = {
^
    at file:///main.js:1:1

    info: Deno does not support CommonJS modules without `.cjs` extension.
    hint: Rewrite this module to ESM or change the file extension to `.cjs`.
Importing types Jump to heading
Many npm packages ship with types, you can import these and use them with types directly:
import chalk from "npm:chalk@5";
Some packages do not ship with types but you can specify their types with the
@deno-types directive. For example, using
a
@types
package:
// @deno-types="npm:@types/express@^4.17"
import express from "npm:express@^4.17";
Module resolution
The official TypeScript compiler tsc supports different
moduleResolution
settings. Deno only supports the modern node16 resolution. Unfortunately many
npm packages fail to correctly provide types under node16 module resolution,
which can result in deno check reporting type errors, that tsc does not
report.
If a default export from an npm: import appears to have a wrong type (with the
right type seemingly being available under the .default property), it's most
likely that the package provides wrong types under node16 module resolution for
imports from ESM. You can verify this by checking if the error also occurs with
tsc --module node16 and "type": "module" in package.json or by consulting
the Are the types wrong? website
(particularly the "node16 from ESM" row).
If you want to use a package that doesn't support TypeScript's node16 module resolution, you can:
- Open an issue at the issue tracker of the package about the problem. (And perhaps contribute a fix 😃 (Although, unfortunately, there is a lack of tooling for packages to support both ESM and CJS, since default exports require different syntaxes. See also microsoft/TypeScript#54593)
- Use a CDN, that rebuilds the
packages for Deno support, instead of an
npm:identifier. - Ignore the type errors you get in your code base with
// @ts-expect-erroror// @ts-ignore.
Including Node types Jump to heading
Node ships with many built-in types like Buffer that might be referenced in an
npm package's types. To load these you must add a types reference directive to
the @types/node package:
/// <reference types="npm:@types/node" />
Note that it is fine to not specify a version for this in most cases because Deno will try to keep it in sync with its internal Node code, but you can always override the version used if necessary.
Executable npm scripts Jump to heading
npm packages with bin entries can be executed from the command line without an
npm install using a specifier in the following format:
npm:<package-name>[@<version-requirement>][/<binary-name>]
For example:
$ deno run --allow-read npm:cowsay@1.5.0 Hello there!
 ______________
< Hello there! >
 --------------
        \   ^__^
         \  (oo)\_______
            (__)\       )\/\
                ||----w |
                ||     ||

$ deno run --allow-read npm:cowsay@1.5.0/cowthink What to eat?
 ______________
( What to eat? )
 --------------
        o   ^__^
         o  (oo)\_______
            (__)\       )\/\
                ||----w |
                ||     ||
Node modules directory Jump to heading
npm specifiers resolve npm packages to a central global npm cache. This works
well in most cases and is ideal since it uses less space and doesn't require a
node_modules directory. That said, you may find cases where an npm package
expects itself to be executing from a node_modules directory. To improve
compatibility and support those packages, you can use the --node-modules-dir
flag.
For example, given main.ts:
import chalk from "npm:chalk@5";

console.log(chalk.green("Hello"));
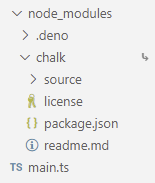
deno run --node-modules-dir main.ts
Running the above command, with a --node-modules-dir flag, will create a
node_modules folder in the current directory with a similar folder structure
to npm:
This is done automatically when calling deno run, no separate install command
necessary.
Alternatively, if you wish to disable the creation of a node_modules directory
entirely, you can set this flag to "none" (ex. --node-modules-dir=none) or
add a "nodeModulesDir": "none" entry to your deno.json configuration file to
make the setting apply to the entire directory tree.
In the case where you want to modify the contents of the node_modules
directory before execution, you can run deno install with
--node-modules-dir, modify the contents, then run the script.
For example:
deno install --node-modules-dir --entrypoint main.ts
deno run --allow-read=. --allow-write=. scripts/your_script_to_modify_node_modules_dir.ts
deno run --node-modules-dir main.ts
Node.js global objects Jump to heading
In Node.js, there are a number of
global objects available in the scope of
all programs that are specific to Node.js, eg. process object.
Here are a few globals that you might encounter in the wild and how to use them in Deno:
process- Deno provides theprocessglobal, which is by far the most popular global used in popular npm packages. It is available to all code. However, Deno will guide you towards importing it explicitly fromnode:processmodule by providing lint warnings and quick-fixes:
console.log(process.versions.deno);
$ deno run process.js
2.0.0
$ deno lint process.js
error[no-process-globals]: NodeJS process global is discouraged in Deno
 --> /process.js:1:13
  |
1 | console.log(process.versions.deno);
  |             ^^^^^^^
  = hint: Add `import process from "node:process";`

  docs: https://lint.deno.land/rules/no-process-globals


Found 1 problem (1 fixable via --fix)
Checked 1 file
-
require()- see CommonJS support -
Buffer- to useBufferAPI it needs to be explicitly imported from thenode:buffermodule:
import { Buffer } from "node:buffer";

const buf = new Buffer(5, "0");
Prefer using
Uint8Array
or other
TypedArray
subclasses instead.
-
__filename- useimport.meta.filenameinstead. -
__dirname- useimport.meta.dirnameinstead.
Node-API addons Jump to heading
Deno supports Node-API addons that are used
by popular npm packages like esbuild,
npm:sqlite3 or
npm:duckdb.
You can expect all packages that use public and documented Node-APIs to work.
Most packages using Node-API addons rely on npm "lifecycle scripts", like
postinstall.
While Deno supports them, they are not run by default due to security
considerations. Read more in
deno install docs.
As of Deno 2.0, npm packages using Node-API addons are only supported when a
node_modules/ directory is present. Add "nodeModulesDir": "auto" or
"nodeModulesDir": "manual" setting your deno.json file, or run with
--node-modules-dir=auto|manual flag to ensure these packages work correctly.
In case of misconfiguration Deno will provide hints how the situation can be
resolved.
Migrating from Node to Deno Jump to heading
Running your Node.js project with Deno is a straightforward process. In most cases you can expect little to no changes to be required, if your project is written using ES modules.
Main points to be aware of, include:
- Importing Node.js built-in modules requires the
node:specifier:
// ❌
import * as fs from "fs";
import * as http from "http";

// ✅
import * as fs from "node:fs";
import * as http from "node:http";
It is recommended to change these import specifiers in your existing project anyway. This is a recommended way to import them in Node.js too.
- Some globals available in Node.js need to be
explicitly imported, eg.
Buffer:
import { Buffer } from "node:buffer";
require()is only available in files with.cjsextension, in other files an instance ofrequire()needs to be created manually. npm dependencies can userequire()regardless of file extension.
Running scripts Jump to heading
Deno supports running npm scripts natively with the
deno task subcommand (If you're
migrating from Node.js, this is similar to the npm run script command).
Consider the following Node.js project with a script called start inside its
package.json:
{
  "name": "my-project",
  "scripts": {
    "start": "eslint"
  }
}
You can execute this script with Deno by running:
deno task start
Optional improvements Jump to heading
One of Deno's core strengths is a unified toolchain that comes with support for TypeScript out of the box, and tools like a linter, formatter and a test runner. Switching to Deno allows you to simplify your toolchain and reduces the number of moving components in your project.
Configuration
Deno has its own config file, deno.json or deno.jsonc, which can be used to
configure your project
You can use it to define dependencies
using the imports option - you can migrate your dependencies one-by-one from
package.json, or elect to not define them in the config file at all and use
npm: specifiers inline in your code.
In addition to specifying dependencies you can use deno.json to define tasks,
lint and format options, path mappings, and other runtime configurations.
Linting
Deno ships with a built-in linter that is written with performance in mind. It's
similar to ESlint, though with a limited number of rules. If you don't rely on
ESLint plugins, you can drop eslint dependency from devDependencies section
of package.json and use deno lint instead.
Deno can lint large projects in just a few milliseconds. You can try it out on your project by running:
deno lint
This will lint all files in your project. When the linter detects a problem, it will show the line in your editor and in the terminal output. An example of what that might look like:
error[no-constant-condition]: Use of a constant expressions as conditions is not allowed.
 --> /my-project/bar.ts:1:5
  |
1 | if (true) {
  |     ^^^^
  = hint: Remove the constant expression

  docs: https://lint.deno.land/rules/no-constant-condition


Found 1 problem
Checked 4 files
Many linting issues can be fixed automatically by passing the --fix flag:
deno lint --fix
A full list of all supported linting rules can be found on
https://lint.deno.land/. To learn more about how to
configure the linter, check out the
deno lint subcommand.
Formatting
Deno ships with a built-in formatter that
can optionally format your code according to the Deno style guide. Instead of
adding prettier to your devDependencies you can instead use Deno's built-in
zero-config code formatter deno fmt.
You can run the formatter on your project by running:
deno fmt
If using deno fmt in CI, you can pass the --check argument to make the
formatter exit with an error when it detects improperly formatted code.
deno fmt --check
The formatting rules can be configured in your deno.json file. To learn more
about how to configure the formatter, check out the
deno fmt subcommand.
Testing
Deno encourages writing tests for your code, and provides a built-in test runner to make it easy to write and run tests. The test runner is tightly integrated into Deno, so that you don't have to do any additional configuration to make TypeScript or other features work.
Deno.test("my test", () => {
  // Your test code here
});
deno test
When passing the --watch flag, the test runner will automatically reload when
any of the imported modules change.
To learn more about the test runner and how to configure it, check out the
deno test subcommand documentation.
Private registries Jump to heading
Deno supports private registries, which allow you to host and share your own modules. This is useful for organizations that want to keep their code private or for individuals who want to share their code with a select group of people.
What are private registries? Jump to heading
Large organizations often host their own private npm registries to manage internal packages securely. These private registries serve as repositories where organizations can publish and store their proprietary or custom packages. Unlike public npm registries, private registries are accessible only to authorized users within the organization.
How to use private registries with Deno Jump to heading
First, configure your
.npmrc file to point
to your private registry. The .npmrc file must be in the project root or
$HOME directory. Add the following to your .npmrc file:
@mycompany:registry=http://mycompany.com:8111/
//mycompany.com:8111/:_auth=secretToken
Replace http://mycompany.com:8111/ with the actual URL of your private
registry and secretToken with your authentication token.
Then update Your deno.json or package.json to specify the import path for
your private package. For example:
{
  "imports": {
    "@mycompany/package": "npm:@mycompany/package@1.0.0"
  }
}
or if you're using a package.json:
{
  "dependencies": {
    "@mycompany/package": "1.0.0"
  }
}
Now you can import your private package in your Deno code:
import { hello } from "@mycompany/package";

console.log(hello());
and run it using the deno run command:
deno run main.ts
Node to Deno Cheatsheet Jump to heading
| Node.js | Deno |
|---|---|
node file.js |
deno file.js |
ts-node file.ts |
deno file.ts |
nodemon |
deno run --watch |
node -e |
deno eval |
npm i / npm install |
deno install |
npm install -g |
deno install -g |
npm run |
deno task |
eslint |
deno lint |
prettier |
deno fmt |
package.json |
deno.json or package.json |
tsc |
deno check ¹ |
typedoc |
deno doc |
jest / ava / mocha / tap / etc |
deno test |
nexe / pkg |
deno compile |
npm explain |
deno info |
nvm / n / fnm |
deno upgrade |
tsserver |
deno lsp |
nyc / c8 / istanbul |
deno coverage |
| benchmarks | deno bench |
¹ Type checking happens automatically, TypeScript compiler is built into the
deno binary.